Tai Chi Chuan  Online Playshop  Lesson Page
WELCOME

Open a new browser window by clicking HERE
to take a look at great old photos of Li Li Da's 
Teacher, Master Wu Kung Yi,
performing the Wu style of T'ai Chi Ch'uan!

LESSON 1:
                             INTRODUCTION
                             PREPARATION
                             OPEN T'AI CHI
                             GRASPING BIRDS TAIL
                             SINGLE WHIP

please read the following text information while the images load on the page

Letters in (  )* stand for the eight directions=N, S, E, W, NW, NE, SW, SE.
Numbers in (  )* correlate to the frame number in main lesson image below,
as much as possible...(some frames are 'in between' described movements,
in which case either I will try to redo the image, or you will need to exercise
your imagination even more than is necessary to learn any movement art from
'text and images' alone in the first place.)
Formula in brackets [W= ] denote weightedness, which is the amount of body
weight shifted to either side (L=left, R=right, even=doubleweightedness);
example: [W=70R] means 'put 70% of your weight on your right side.' The range
here will be approximate, ideally based on an individuals personal needs, abilities
and experience.
*
You may choose to read through the text the first time disregarding these
parentheticals...it's easier!!
We OPEN  the set facing North (N); as you view images on
your monitor for the current postures (below), imagine that
you are again facing North as you complete Single whip.

 
                                                    Preparation
                                                    Open T'ai Chi
                                                    Grasping birds tail
                                                    Single whip

Preparation    (1)

     Preparation for t'ai chi is as necessary to doing it 'right' as is readying to bake good bread or researching to be a good parent...if the yeast is too cold, the dough cannot properly rise...if one does not adequately study child-rearing, one will probably give to the world mediocre progeny.  So give yourself a moment before the set to prepare well.
     Breathing is done through the nose only; breathe in slowly through the nostrils, (it seems like you are) pulling the air down behind your chest to the bottom of your stomach, then allow the air to be pushed out from the base of the belly, up, up, slowly up, and out of the nostrils.  Your exhale should last up to twice as long as your inhale.  Inhalations should generally coincide with the yin movements (those which yield, or receive energy), while exhalations should generally coincide with the yang movements (those which push, or send energy.)  Over time, you will find that concentrating on your breathing
will enhance your balance and strength.
     Being grounded is a basic element of being balanced in our movement. Having neither wings nor a very delicate girth, humans must in some measure remain down to earth in order to move well.  Some people practice visualization techniques to imagine roots growing from the bottoms of their soles into the floor or earth beneath.  Another way to stay grounded is to
maintain continuous breathing while focusing our 'mental' self upon the
tan tien below and away from the brain above.

     Generally, the position of the head throughout the form is based on the movements of the hands.  With some few exceptions, the eyes, following the arm and hand motions, direct where the head will be pointed.  A few postures
that are exceptions to this exist, e.g., "arms make the mountains". Generally,
too, the eyes gaze should be directed in front of you at eye level.  Mostly, you will find that the head, moving as one with the rest of the body, will face in the same direction as the entire torso.
     Generally keep the thumb nestled near to the other fingers, not out away from the hand.  Alternatively, it may be tucked comfortably behind/across the palm of the hand.
     Remember to always bend your elbows, always bend your knees.  Bent knees and elbows, like moving on a curve, are two very important funda-mentals of Wu style t'ai chi which I will go into in depth soon.  For now,know that it is important to practice with your knees and elbows at least slightly bent. This reduces weight and pressure impact, as does the practice
of moving in slightly curved, not straight, lines with your arms, legs, and torso.

     One last thing: an invisible line (or, thread, it is sometimes called) from foot to head connects through us creating an axis the center from which we may rotate and glide and bend and swing our bodies as one.  The Chinese name for this 'thread' is 'ding jin'; it runs from the heels of the feet, up through the thighs and buttocks, through the center (tan tien), through the
chin and out through the crown of the head.  By moving on this axis line from a center-of-gravity point in your body (tan tien), you can move more using less energy. It is said that with t'ai chi, one can move 1,000 pounds with
a 1/4 ounce of pressure.  Hmmmm.
     Preparation (1) begins by standing with your toes pointing forward and your feet about shoulder width apart; arms resting at your sides, palms facing slightly backward; buttocks tucked in (not protruding); make sure your shoulders are not pushed forward; hold your chin in a bit and your head up with your eyes looking forward, resting your gaze at eye level ahead of you
and out a slight distance. Your mouth should remain closed throughout the set with the tongue resting against the roof of the mouth, its tip touching against the back of your upper front teeth. (1)


I have found a wonderful online article describing Preparation; you can click through on the following link to get to it
http://web.archive.org/web/20010630044850/users.supernet.com/etownchi/flow/posture_focus/lundgren01--1998.htm
(thanks
, John P, for locating this for me again!)

Open T'ai Chi     (1 through 21)

     Energy within us is centered at the tan tien (roughly pronounced 'don dee-en'; one alt. sp.: dantian), a place an inch or two below the navel, along the ding jin axis or thread.  By focusing our minds attention at the tan tienduring movement, we can maintain a flowing, continuous balance-in-motion, moving ourselves (and our seemingly separate constituent body parts ~ arms, legs, head, inner organs, etc.) as one, with less effort, which will yield enormous benefits to our health and our 'being'.  As you may quickly find, if, when you are moving as one, you should momentarily THINK of something; anything,
really; what happens is that the mental energy previously focused at your center of balance literally rises to the brain, where conscious thinking activity resides... the result can be comical as the mental energy of a conscious thought rises up inside, pulling us UP with it and usually buoying us off balance or knocking us over altogether! Such is the importance of mind-
fulness
in the practice of t'ai chi ch'uan (or in anything, really.)

     Open t'ai chi begins (1,2) [W= even] as you draw a deep breathe in slowly, and allow your arms, palms facing down, to rise before you (2-6), as if drawn upwards by threads attached to the back of your hands. As your hands reach an apex (6) at around eye level, your arms, with elbows slightly bent, begin their descent back again (7), as if they are being pulled lower from the sinking down of your elbows.   As they do, you sink, by bending your knees slightly¹   to pull your torso down (7-10).   As your hands lower to their nadir in front of your waist, your palms move from parallel with the floor (palms facing down) (7) to about parallel with your legs (palms facing you) (10).
     At this point, rotate your hands and elbows in the opposite direction to each other so that your palms slowly turn to first face each other, then continue rotating until both palms face outward away from you (North) (11,12). Concurrently, begin to shift your weight to your right leg.  As you do, start twisting on the ball of your right foot (11) [W= 70R] to point your right toes to the right corner (NE)².  Now, with your right foot angled to the right corn-er, finish shifting your weight (13-15) until single weighted on your right side [W= 90R] (90% of the bodies weight over right leg.)  As this is happening, your elbows, in their descent, have neared your abdomen³.
     Next, bring your arms apart, moving them away from each other sideways, to shoulder level, (13-15) as your palms move slowly from facing outward (12) to facing each other as they rise until they face away (North) from you at shoulder level (15).  As you separate/raise your arms, lift your left heel and then slowly step your left foot out comfortably in front of your left leg and rest the left heel on the floor (13-15) [W= 90R], then pivot on your left heel 45° (16-17) pointing the toe toward front right corner (NE).  As you are pivoting on your left heel, your left arm swings out forward ending up extended 'at arms length' (remember: elbow slightly bent) directly before your face with the left palm facing you and simultaneously your right elbow bends acutely, swinging your right hand in to position about 4 inches in front of your chin at shoulder level, your right palm rotating to face away from you (18).
     Moving your body forward, shift your weight slowly to your left leg until almost single weighted on it [W= 80L], at the same time pushing your right palm out to meet your left palm (which does not move here), leaving an inch or so distance between the palms (19-21); as the weight shifts forward onto the left side, your torso should move as one, allowing your center point of gravity (tan tien) to move you forward.  Do NOT let your head (brain) or arms or legs pull the rest of you along.  The centerleads the rest of the bodies motion. (ALWAYS)

Grasping birds tail    (21 through 32)

     At this point, the right arm swings away (21-23) to your right side, ex-tending (bent elbow!) fully, palm facing out.  (Left hand remains in place.)Your torso will likewise bend away slightly to the right side with this motion, as you continue to shift the weight onto your left leg almost completely [W= 90L]. This frees up your right leg to swing out in front of you (you are now facing East if you started out facing North) (23-25); do this by lifting your right foot (raise heel, then toe), then shifting it over to your left and easing it down on its heel only.  (Try always to make the arms and legs swing in slight arcing motions, not straight lines or hard angles; round all of your movements for optimal benefit.)  At this point you are facing completely East.  Notice that your left foot is (25) at the perfect angle (45°) for support.
     Next rotate your right hand so that the palm faces upward; as you do, move your left hand slowly forward (on slight curve) until the fingertips of your left hand (palm down) lightly graze upon the inner wrist of the right hand (26).  Then, side your right foot [look carefully! This is barely visible in this image due to the slightness of the movement] by lifting it off  its heel, and gently resting it still on its heel only, just two inches to the right. (The hands remain still as you side your right foot.)  Then, begin to shift your weight slowly forward again onto the right leg [W= 60L], directing your chi ~ ~ movement ~ ~ to the left of you (NE).  As you shift your weight forward, your right toe rests on the floor again with the heel. [W= 70R]
(Your hands are still together, either hovering or slightly touching, with right hand palm up, left hand palm down.)

     Then draw your hands slowly across in an arc from your left (NE corner) to your right (SE corner) (27-29); as you do, gently rotating the right palm to the North (actually, NE), left fingertips still grazing your right inner wrist, left palm facing South (SW once your torso faces SE corner).  When both hands reach the (SE) corner, slowly shift your weight back [W= 60L] onto your left leg with your torso and arms moving along as one. As this happens both elbows bend down more, bringing your hands up, with fingertips pointing more toward the ceiling. (30)  Your right foot lifts your right toe up, with the
heel
remaining on the floor.  Your left foot remains still (throughout this) at a 45° angle (pointing NE); your right foot is now at a 45° angle (pointing SE) resting on the heel [W= 80L].  Together, your feet form at a 90° angle.
     To finish Grasping birds tail, your whole body pivots as one on your right heel, to your left (NE corner) [W= 60L] until both feet are parallel (your left foot remains still.)  The right foot rests flat (lower your toes) [W= even] after you pivot.  All the time you are pivoting forward and are shifting to your right, your left hand (still hovering at your right inner wrist) becomes more parallel to the floor as your left elbow rises slightly to equal the elevation of your right elbow (notice that before pivoting, while still facing SE, the right elbow is elevated just above the left elbow.)
     Here's the grasp: shift your weight again back to your right side as you move East with your hands still together, right palm facing NE [W= 70R].  Now slightly raise both elbows simultaneously (away from each other) making your right and left hands at right angles to one another (right palm facing North; left palm facing South) (31). Turn your right palm so that it faces away to your right side (East); with your left fingertips hovering against your inner right wrist, bend your right wrist downward and fold your right fingertips together (pointing down, your fingertips and thumb tip gathered as one at the end of your fingertips so that your right hand looks 'beakish'.)
     Your right arm points NE as you finish the posture, as both it and your left hand end up at shoulder height. Your left fingertips (pointing East) are grazing against your right wrist, and your left palm is facing South.  Your feet both point to the NE corner. (32) [W= 70R]  There follow seven more occurances of grasping birds tail throughout this Wu style set, so practicing it should become easier over time.

Single whip    (32 through 36)
                                                      (click HEREto skip following digression)

      Because the essence of t'ai chi is about oneness and therefore continuity, one thing I am not real clear on is where one named posture in the form ends, and where the next posture begins.  This is in part because of the evolution of postures and names for them down through the centuries; one style evolved into another, those to, in turn, evolve again.  So it is that the style I have learned and now relate here is what I was taught by several of the senior students of the late Li Lida.  As with any oral or non written tradition, though, it is natural for some diversity of viewpoint on matters fundamental amongst
adherents of any one sub-style. One other reason for confusion on where postures end is the very nature of t'ai chi (and its form), which is
contiguous. The reasons I have digressed on this topic are two:

   1)  In this instance (as in many in the form) the transition point between grasping birds tail and single whip is NOT obvious; it could be earlier than I described above; but continuity really negates any need for strict accuracy in these regards, as motion throughout the set is nonstop, so there are no REAL endings.  The names and descriptions are useful to the understanding of t'ai chi practice, yet paragraph and period placement are less so.
   2)  In the case of single whip, the written description of the posture is so slight, I felt this might be the appropriate place for some padding ~LOL~ anyway, to continue,  :)  smiles  (:

     Single whip begins :) by drawing your left foot further leftward (lift heel up first, then toe) to a comfortable distance (don't over-do, dont under-do) at a point where it is parallel with your right foot (both feet are still at 45° angles, pointing NE), and the left toe lines up even on the floor with the instep of the right foot (set toe down first, then heel) (32). Then, shifting your weight to your left [W= 60R] (33-36), draw your left hand in that direction too, across the front of your face, with your fingertips at eye level, pointing upward and slightly to the right, your palm facing in. (31-32Keep your right hand
stationary through the entire posture.

     As your left hand passes your face (33) rotate your palm away from you, with your left arm continuing to move left (West) until it points NW at about a 45° angle to your torso, creating about a 90° angle with your right arm which is still pointing NEAs your left palm passes in front of your face, your head begins rotating toward your left,  following the movement of your left hand (34), and rests facing the same corner (NW).  As your left palm passes your face (33-34), rotates outward (35) and stops (36), palm facing away toward the left (NW) corner, your left foot moves in tandem with it, and with your turning head, by pivoting on the heel (34), turning your left toes to the corner (NW) (34-35), then settling your left toes down, creating about a 90° angle with your right foot. (36) [W= even]

(Remember to keep your knees and elbows at least slightly bent and your pelvis tucked in throughout the set.)

(If at all possible, it is suggested that someone read the text to you - or record it on a tape and play it back - while you slowly practice the form...and slowlyis
the best way to practice.)
 

notes:

¹  Never position your knee past the tips of your toes; draw an invisible line from your kneecap down to the front tip of your foot.  You have bent your knees too much if they go forward further than your toe tips--bad ding jin) go back

²  In t'ai chi, we consider 8 radial axes: the four directions--N, S, E, W; and the four corners--NE, SW, SE, NW--for the purposes of the lesson page here, the set begins facing North. go back

³  Fist space/separates: always leave a gap between your arms/hands and your torso equal to the size of your fist--no touching your arms/hands to your torso, generally.  (You should have room to place your fist between your torso and
your arm at your armpit.)
go back

The links back to the above footnote numbers will only return you to
the very first use of that number in the above text, not to the subsequent
references on this page to the same footnote number.

do not over-do     do not under-do

List  of  Moves
 

FUNDAMENTALS OF
T'AI CHI CH'UAN
breathing
moving as one
being grounded
tan tien (center of balance)
ding jin (common axis)
continuity
single weightednes
double weightedness
yin/yang duality
bent knees and elbows
fist space/separates
moving on a curve
moving slowly
as time permits i will explain these
concepts and expand the list of
fundamentals

May I suggest the best way to see these images in the days after the lesson page has changed is to
'right click' on those images you want
NOW and click
'save image as', then save it to some hard drive (the loads are BIG!)
You can also freely copy/paste/amend the text. (But do not sell, please)

~ ~ special thanks ~ ~
to
Michael W and Shar'n
for making free cyberspace available for MORE Playshop lessons at
www.caliban.net
NOW all of the Playshop lessons should ALWAYS be available online
~ ~ ~

If the pictures stop animating on your page, hit reload (refresh)
(I've even had to "clear memory cache" first, if I interrupted initial page loading)
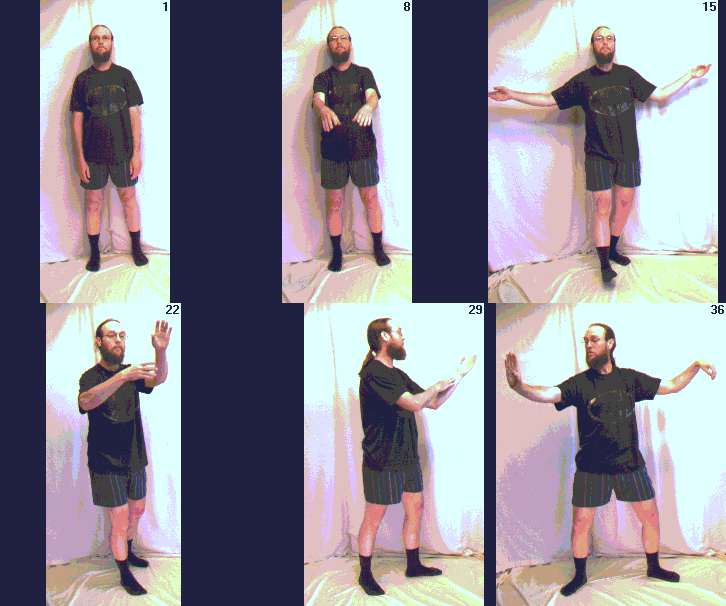


Above is a mirror (reverse) image of the
Right Hand Set, which means that if you
follow, or mirror, my movement on your monitor
you will be performing a Right Hand Set...
(T'ai chi is practiced from both sides)
When YOU practice t'ai chi, move slowly
(and hopefully less jerkily than this animation)
 

.
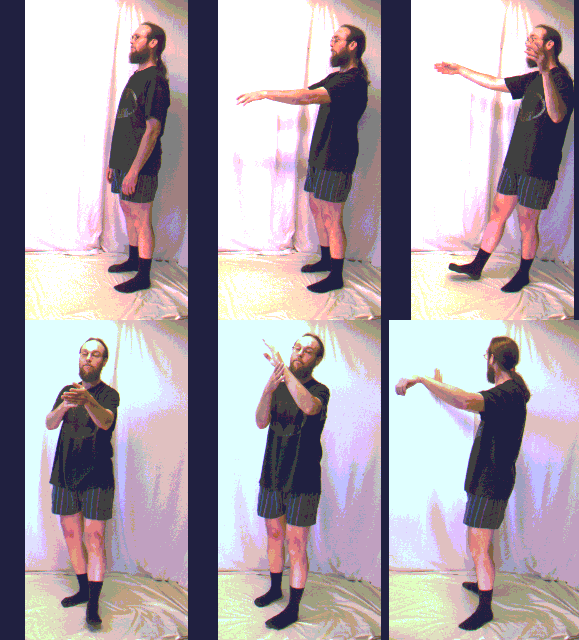
..

 
The
same
postures
as they
would be
seen
viewed
from
the East
(your right)
remember:
this is a
mirror image

click>>>NEXT LESSON - 2<<<here

~   ~   ~   ~   ~

notes:
I made the T'ai Chi graphic images using a reverse image option so that I could
video the Left Hand Set, then when it is viewed here on your monitor, it appears as a mirror image of a
Right Hand Set, which you can emulate by following my movements.  Most T'ai Chi students only
learn the Right Hand Set, and it is a good way to start.  One can practice the opposite side movements
(Left Hand) by practicing the reverse of the image(s) above.  I am fortunate that the students who
instructed me at my t'ai chi beginning practiced both sides of the set daily.  By learning the left and
right versions (identical, just reversed) of t'ai chi, I believe one may gain even more.


~   ~   ~   ~   ~

more notes:

Please let me know what you like here and what really bugs you here, too
TO EMAIL HERE PLEASE MANUALLY CHANGE 'AT' TO '@'

Is there some aspect of the movement not made clear by the images (or the text, for that matter)??  Please tell me, and if I cannot clarify it with words I will try to make a new image to illustrate a way out of that confusion.


~   ~   ~   ~   ~

still more notes:

It is better by far to experience learning Tai Chi of any kind in a group setting, primarily for two reasons.  First, it's more fun! and nothing is better for learning than sharing ideas and practice with individuals who share the same interests.  By having many artisans practice together, this allows for an excellent source of useful feedback.  More than critically watching the moves as others do them, this also affords an opportunity that is unparalleled: by standing in the center surrounded by more advanced students, with every movement in every direction, the novice has a rotating view of the form.  This allows the newer student to follow all the others, even as the plane of movement tangents onto a new direction.  Turn left, a senior student is in front to follow from; turn right, another teacher is in view;
spin around 180° and, yep, you guessed it.

Though learning Tai Chi from pictures, and (sometimes even worse) from text, is not the best method to use...it is what I can offer.  Some people have little or no access to teachers or classes in their area; some have little or no money for them even if they did exist; some folk are shy and some may be to dis-eased to go to a class; it is for all these people (the ones online, at least) and of course for the martial arts intellectuals (you know who you are) that I make this meager presentation.

TAI CHI CLASSES
For anyone in or near (or just visiting) the San Francisco Bay Area, please accept our invitation to join us in our VIRTUAL REALITY PLAYSHOP
(real people), any Saturday morning from 8:45 a.m. to 9:45 a.m.
at 1819 10th Street, in Berkeley.
(The set usually begins @ 9:10 a.m. Saturday
Just take the outside stairs on the south side of Finnish Hall to the top to get in--or take the disabled folks elevator inside--if you need it)

 ~   ~   ~   ~   ~

 finally! feedback
finally, your notes:

    Scott, I HAVE FEEDBACK FOR YOU
    and/or
I wanna get email when the lesson page changes :)

FEEDBACK FORM:


TO USE THE FORM BELOW PLEASE MANUALLY CHANGE 'AT' TO '@'


(optional)
what's your name?


(optional)
enter your correct email address:
 if you do not i cannot respond


(optional)
do you want to be emailed when the lesson changes?
If so, you have to enter email address
Yes! I clicked the button here and typed or pasted my eddress above
  :)
NOTIFY ME WHEN THE NEXT ONE IS UP!
    
No! I will check back here someday whenever I feel like it, thanks!


ENTER Your thoughts about this page in the form below
(any ideas or suggestions you may have)


Click 'Send Feedback' button when you've finished.
If you can't see the feedback form on your browser or it doesn't want to work with your browser for any reason, please click here to send a regular email with any or all of the information asked for above...thanks!
TO EMAIL HERE PLEASE MANUALLY CHANGE 'AT' TO '@'
~   ~   ~   ~   ~

Only you yourself will know if you have stretched
your chi 'enough', 'too much', or even 'not enough'.  What we desire to achieve with T'ai Chi is
balance: to get there, moderation, not excess, is required.

~   ~   ~   ~   ~

Keep in mind while upon this new journey that we do it for our health, for our joy, for our spiritual
reawakening...not to suffer more, but to complete ourselves

as beings, and rejoice of the universe.

~   ~   ~   ~   ~

With gratitude to Li Lida      (1922-1982)


SPECIAL THANKS
to Ruth, David, Lydia, Michael G, Shar'n, Harold, Eileen, Robert,
and all of the other people who have helped me learn T'ai Chi...


injoy
heartLove!


 BOOKMARK THIS PAGE
~FOR EASY RETURN

this webpage was originally created at
8:33 P.M. P.S.T., on Tuesday, July 14, 1998

nothing new here in this part of the Universe since
November 27, 2006 at 4:55 P.M.

last updated on Monday, July 19, 2010 at 9:03 P.M. P.S.T.

  COPYWRONG © 1997-2010  swrichie    ALL RIGHTS REVERSED

copywrong © 1998-2010 by swrichie for hand use creations 

ALL RIGHTS REVERSED

~   ~   ~   ~   ~
 
we share some common strand in this universe...we as one